Skip to end of metadata
Go to start of metadata

You are viewing an old version of this page. View the current version.

Compare with Current View Page History

« Previous Version 43 Next »

Prepare to Migrate

  • Run the Noah System DB Maintenance tool before migration
    Noah System DB Maintenance

  • When you run the Noah ES Migrator Tool under the default Simple tab, it will automatically create nhax files from your Noah System database, then upload and import the nhax files to Noah ES

  • The export MUST come from Noah version 4.14

  • Before beginning the migration to Noah ES, check your Noah System patient numbering setup in the Noah Console under Server Administration, Patient Numbering Tool. The default setting in Noah ES is automatic patient numbering. If you are using manual patient numbering in Noah System, change the patient numbering in Noah ES to Manual BEFORE migrating data to Noah ES. The setting for patient numbering is found in the Noah ES Portal under Settings, Patient Numbering.

  • When you migrate data to Noah ES using the Simple tab, the files are encrypted automatically and no password needs to be entered when creating the enhax files or when they are imported.

Migrate the eNhax files to Noah ES

Download Noah ES Data Migrator

  1. Close Noah System or Noah ES if running

  2. Download the Noah ES Migrator Tool from this page, download found directly above. Unzip the file and run “NoahESDataMigrator1.0.0.28.exe” file

  3. Launch the Migrator tool NoahESDataMigratorGUI.exe as Administrator

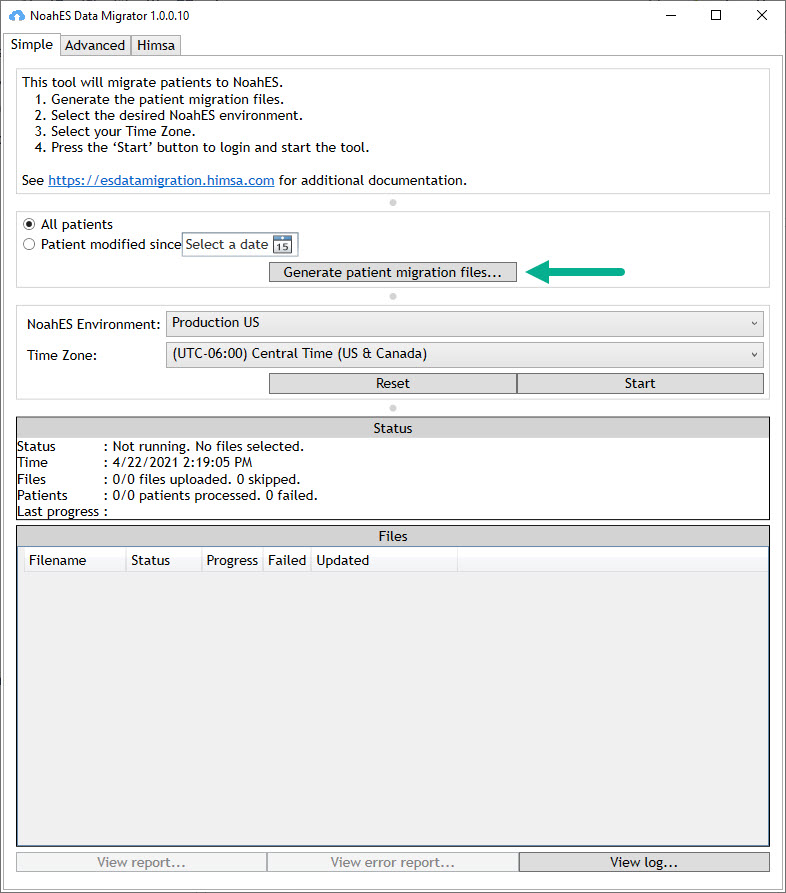
  4. Select either Production US or Production EU based on your location

  5. Verify that the Time Zone listed matches the time zone of your location

  6. Select Generate Patient Migration files

  7. Log in with a Noah System account that has export privileges, click OK

  8. The creation of the patient migration files in enhax format will begin, and complete. The default is to create enhax files with 300 patient records each.

  9. Click Start, you will be prompted to login to your Noah ES account

    1. you will not see Noah ES open, just the message that you have been logged in

    2. once logged in, click back on the Migrator Tool

  10. The upload and migration will begin, progress will be shown under Status in the tool.

    1. The Status will first report Validating as it reviews the data in the enhax

    2. Next the tool reports Uploading – the enhax files are moved to the Noah cloud

    3. Status is Uploaded – once all enhax files have been moved

    4. Next the migration tool moves to Processing, depending on the size of the database and number of files this step may take some time:

    5. When finished tool will report Completed

  11. Once complete you will see message that you can now close the program.

Verify the data was moved successfully

In the Noah ES Data Migrator you can see when the migration is complete under Status and under Files.

The number of files uploaded and number of patient records migrated is recorded.

If any records ‘Failed’ or were skipped, it is noted in the Migration Tool. If records are failed or skipped they have not successfully moved to Noah ES and it should be investigated.

Report any problems by selecting the ‘View error report’ and then saving and uploading to the Noah ES Support Portal.

Submit an issue or Question - Noah ES online Help Desk

Migrate additional patient records at a later date

If you have done the main migration from a Noah System database but add or update additional records to Noah System before you make the final move to Noah ES, you can use the Data Migrator to search for and migrate ‘Patient modified since’ to select recent records.

  • No labels