Migrate the eNhax files to Noah ES
Close Noah System or Noah ES if running
Download the Noah ES Migrator Tool from this page, download found directly above. Unzip the file and run “NoahESDataMigrator1.0.0.16.exe” file
Launch the Migrator tool NoahESDataMigratorGUI.exe as Administrator
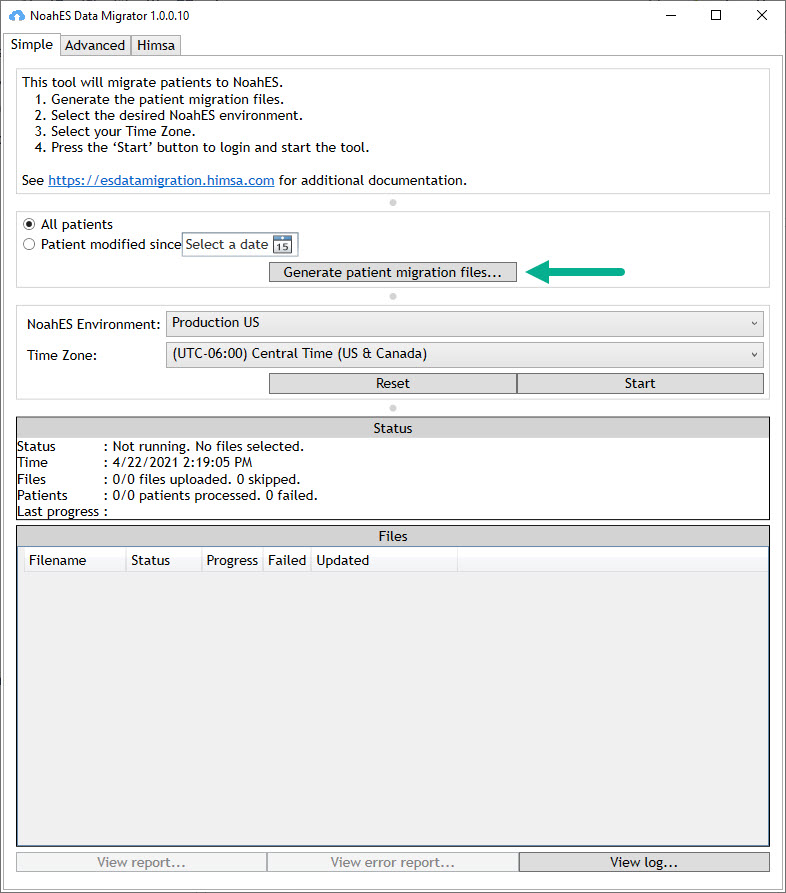
Select either Production US or Production EU based on your location
Verify that the Time Zone listed matches the time zone of your location
Select Generate Patient Migration files
Log in with a Noah System account that has export privileges, click OK
The creation of the patient migration files will begin, and complete.
Click Start, you will be prompted to login to your Noah ES account
you will not see Noah ES open, just the message that you have been logged in
once logged in, click back on the Migrator Tool
The upload and migration will begin, progress will be shown under Status and Files in the tool
Behind the scenes, a copy of the file(s) is created in the c:\Program Data\HIMSA\Noah\NoahESUpload\Files directory
The original source file(s) is not deleted
The copy of a file is deleted when the tool is finished with it
You can leave the Noah ES Data Migrator open to view progress details or close and relaunch later to check the status
When all patients have been migrated to Noah ES and the tool is complete you will see message that you can now close the program.
Verify the data was moved successfully
In the Noah ES Data Migrator you can see when the migration is complete under Status and under Files.
The number of files uploaded and number of patient records migrated is recorded.
If any records ‘Failed’ or were skipped, it is noted in the Migration Tool. If records are failed or skipped they have not successfully moved to Noah ES and it should be investigated.
Report any problems by selecting the ‘View error report’ and then saving and uploading to the Noah ES Support Portal.

